
Easy Simple Chocolate Bun Recipe Guide
Table of Contents
- Introduction: Your New Go-To Simple Chocolate Bun Recipe
- How This Simple Chocolate Bun Recipe Works
- Why This Recipe Works
- Ingredients and Smart Substitutions for Your Simple Chocolate Buns
- How to Make Simple Chocolate Buns
- Expert Tips for Perfect Simple Chocolate Buns
- What to Serve With Your Simple Chocolate Buns
- Storing and Reheating Simple Chocolate Buns
- Simple Chocolate Bun Recipe FAQ
Introduction: Your New Go-To Simple Chocolate Bun Recipe
Imagine this: waking up to the intoxicating aroma of freshly baked goods, sinking your teeth into a cloud-soft bun bursting with molten chocolate. That, my friends, is the magic of this simple chocolate bun recipe! For years, I’ve been on a quest for the perfect balance of richness, fluffiness, and ease in a chocolate bun, and I’m thrilled to share that this recipe truly delivers. There’s something incredibly satisfying about creating these delicious treats from scratch, and the joy they bring to my family’s breakfast table (or even a late-night snack!) is unparalleled. This isn’t just any recipe; it’s designed to be approachable for bakers of all skill levels, ensuring a delightful result every single time. It’s truly special because it promises an incredibly tender crumb and deep chocolate flavor with minimal fuss. And if you’re looking for more delightful baking inspiration, you can See more easy recipes right here on the blog!
How This Simple Chocolate Bun Recipe Works
Understanding the science behind baking makes all the difference! This simple chocolate bun recipe relies on a few key principles to achieve its delectable results.
Achieving fluffy texture: The hero here is active dry yeast. When activated correctly with warm liquid and a touch of sugar, it produces carbon dioxide gas, which gets trapped in the dough’s gluten structure, creating those wonderful air pockets that lead to a light, airy, and incredibly fluffy bun. Warmth is crucial for optimal yeast activity.
Balancing sweetness: We achieve a deep, satisfying chocolate flavor through a combination of ingredients. Good quality cocoa powder provides an earthy, rich chocolate base, while the addition of chocolate chips (or chunks!) melts into gooey pockets of pure bliss, providing bursts of sweetness that are perfectly balanced, preventing the buns from being overly sugary.
Ease of preparation: Perhaps the most appealing aspect for busy home bakers! This recipe is designed For minimal kneading. The dough comes together easily and develops sufficient gluten with just a short kneading period, allowing you to achieve maximum results with significantly less effort than traditional bread recipes. This means more time enjoying your freshly baked treats and less time in the kitchen!
Why This Recipe Works
- Unbeatable Softness: The combination of milk, egg, and butter ensures an incredibly tender crumb that practically melts in your mouth.
- Rich Chocolate Flavor: We use both cocoa powder in the dough and plenty of chocolate chips for a double dose of chocolatey goodness.
- Forgiving Dough: This recipe uses a forgiving, easy-to-handle dough that’s perfect for beginners and experienced bakers alike, requiring minimal kneading.
- Versatile Treat: Perfect for breakfast, brunch, or an afternoon pick-me-up, these buns are always a crowd-pleaser.
Ingredients and Smart Substitutions for Your Simple Chocolate Buns
Here is what you need and why:
All-purpose flour: For this simple chocolate bun recipe, I typically use unbleached all-purpose flour. It provides a good balance of protein for structure and tenderness. You can absolutely substitute bread flour for a slightly chewier bun with more robust gluten development, or even a mix of both.
Active Dry Yeast: This is our leavening agent! Ensure your yeast is fresh. Why warm milk (around 105-115°F/40-46°C) is crucial? This temperature range activates the yeast without killing it. Too hot, and the yeast dies; too cold, and it won’t activate properly.
Granulated Sugar: Not just for sweetness, sugar also feeds the yeast, aiding in its activation and contributing to the browning of the buns. You can reduce the sugar slightly if you prefer less sweet buns, but moderation is key for yeast activity. Alternatives like brown sugar would change the texture and flavor, adding a molasses note.
Unsalted Butter: Butter provides incredible richness and flavor, contributing to a tender crumb. I prefer unsalted so I can control the salt content. If using salted butter, reduce the added salt in the recipe by about half. You can substitute a neutral-flavored oil (like vegetable oil) for a softer bun, though you’ll lose some of that classic buttery flavor. For a vegan option, use a good quality plant-based butter.
Unsweetened Cocoa Powder: This provides the primary chocolate flavor in the dough. Opt for good quality unsweetened cocoa powder – Dutch-processed will give a darker color and milder flavor, while natural cocoa powder is lighter in color and more acidic (which can react with baking soda, though we’re relying on yeast here). A high-quality cocoa makes all the difference!
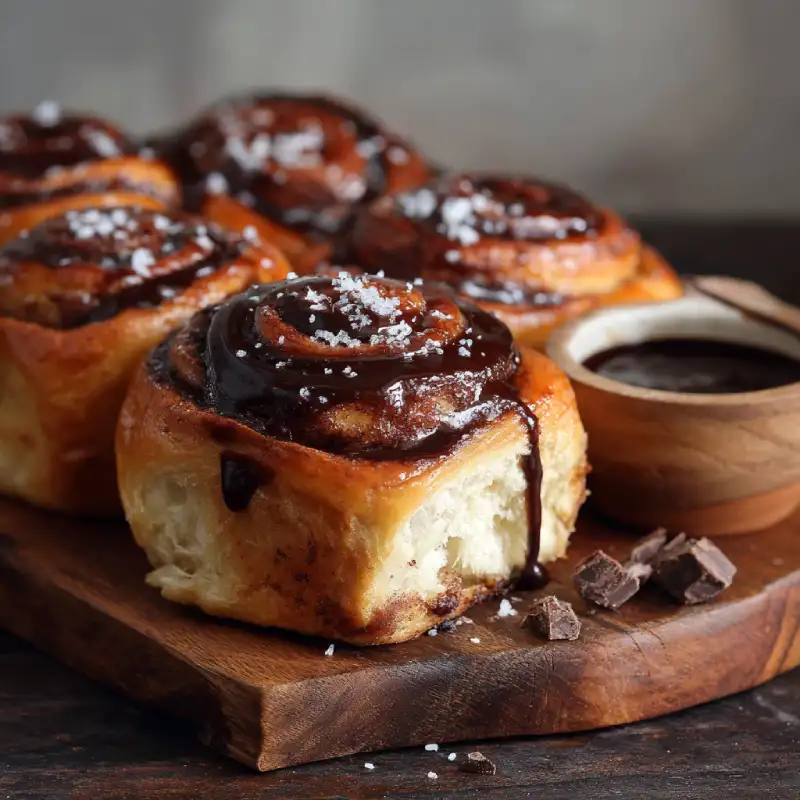
Chocolate Chips: I love semi-sweet chocolate chips for a classic flavor contrast. You can use milk chocolate for a sweeter bun, dark chocolate for a more intense cocoa hit, or even chocolate chunks for larger pockets of melted chocolate. Mini chips also work wonderfully for more even distribution.
Whole Milk: Provides moisture and richness, and the lactose contributes to browning. Whole milk yields the most tender buns, but 2% milk will also work. For dairy-free, substitute with a good quality non-dairy milk like almond or oat milk.
Large Egg: The egg adds richness, helps with structure, and provides a beautiful golden hue to the finished buns. It also contributes to the tender texture. For an egg-free option, you can try a flax egg (1 tbsp ground flaxseed mixed with 3 tbsp water, let sit for 5 minutes).
Salt: A crucial ingredient that enhances all the flavors and balances the sweetness. Don’t skip it!
How to Make Simple Chocolate Buns
Follow these step-by-step instructions to bake your own perfect simple chocolate bun recipe:
1. Proof the Yeast
In a large bowl, warm the milk to about 105-115°F (40-46°C). It should feel comfortably warm, not hot, to the touch. Stir in one teaspoon of sugar, then sprinkle the active dry yeast over the milk. Let it sit for 5-10 minutes until foamy. This indicates your yeast is active and ready to work its magic!
2. Mix the Dough
Once the yeast is bubbly, add the remaining sugar, melted butter, egg, cocoa powder, and salt to the bowl with the yeast mixture. Whisk well to combine. Gradually add the all-purpose flour, mixing with a wooden spoon or spatula until a shaggy dough forms. At this point, stir in your chocolate chips.
3. Knead and First Rise
Turn the dough out onto a lightly floured surface. Knead for 5-7 minutes until the dough is smooth and elastic. It should be slightly tacky but not sticky. Lightly grease a clean bowl, place the dough in it, turning once to coat. Cover the bowl with plastic wrap or a clean kitchen towel and let it rise in a warm, draft-free place for 1-1.5 hours, or until doubled in size.
4. Shape the Buns and Second Rise
Gently punch down the risen dough to release the air. Divide the dough into 12 equal pieces. Roll each piece into a smooth ball and arrange them in a greased 9×13 inch baking pan, leaving a little space between each bun. Cover the pan loosely with plastic wrap or a towel and let them rise again in a warm spot for 30-45 minutes, or until noticeably puffy.
5. Bake and Cool
Preheat your oven to 375°F (190°C). Once the buns have completed their second rise, bake for 18-22 minutes, or until golden brown on top and cooked through. If they start to brown too quickly, you can loosely tent them with foil. Remove from the oven and let cool in the pan for 5-10 minutes before transferring to a wire rack to cool completely. The resting period is crucial for the internal structure to set.
Expert Tips for Perfect Simple Chocolate Buns
- Don’t Kill the Yeast: Yeast is sensitive! Always check your milk temperature with a thermometer. Too hot (above 120°F/49°C) will kill it, too cold (below 100°F/38°C) won’t activate it effectively.
- Measure Accurately: Especially for flour. Using a kitchen scale to measure flour by weight (grams) rather than volume (cups) is far more accurate and will lead to consistent results every time. King Arthur Baking has great insights on flour types.
- Proofing Environment: A warm, draft-free space is ideal for dough rising. If your kitchen is cool, try placing the covered bowl in a slightly warm (but turned off!) oven, or near a warm window.
- Preventing Dry Buns: Don’t overbake! Buns can go from perfectly baked to dry in a matter of minutes. Look for a golden brown color and an internal temperature of about 190-200°F (88-93°C) with an instant-read thermometer.
- Adding Extra Flavor: Elevate your buns with a pinch of cinnamon, a dash of espresso powder (which enhances chocolate flavor!), or a spoonful of orange zest mixed into the dough.
What to Serve With Your Simple Chocolate Buns
These decadent chocolate buns are incredibly versatile! For breakfast or brunch, they pair beautifully with a hot mug of coffee, a soothing cup of tea, or a tall glass of cold milk. For a more indulgent dessert, warm them slightly and serve with a scoop of vanilla ice cream or a drizzle of chocolate sauce. A simple fruit compote on the side adds a lovely fresh contrast. And sometimes, the purest pleasure is just a swipe of softened butter or your favorite jam.
Storing and Reheating Simple Chocolate Buns
To keep your simple chocolate bun recipe creations fresh, store them in an airtight container at room temperature for up to 2-3 days. For longer preservation, these buns freeze wonderfully! Once completely cooled, place them in a freezer-safe bag or container and freeze for up to 2 months. To reheat from frozen, simply let them thaw at room temperature, then pop them into a preheated 350°F (175°C) oven for about 5-10 minutes until warmed through and soft again. You can also microwave them for 15-30 seconds, but be careful not to overheat, as this can make them tough.
Simple Chocolate Bun Recipe FAQ
Why didn’t my buns rise?
Can I use different chocolate?
How do I know when they’re baked through?
Can I make the dough ahead?
Simple Chocolate Buns
- Total Time: 45 minutes
- Yield: 12 buns
Description
These simple chocolate buns are incredibly soft, fluffy, and packed with gooey chocolate chips. Perfect for breakfast or a sweet treat anytime, this recipe is easy to follow for all skill levels.
Ingredients
- 2 ¼ teaspoons active dry yeast (1 standard packet)
- 1 cup (240ml) warm whole milk (105-115°F / 40-46°C)
- ⅓ cup (65g) granulated sugar, divided
- ¼ cup (56g) unsalted butter, melted
- 1 large egg, room temperature
- ½ teaspoon salt
- ¼ cup (25g) unsweetened cocoa powder
- 2 ½ – 3 cups (300-360g) all-purpose flour, plus more for dusting
- 1 cup (170g) semi-sweet chocolate chips
Instructions
- 1. Proof the Yeast: In a large bowl, whisk warm milk with 1 teaspoon of the granulated sugar. Sprinkle yeast over the mixture and let stand for 5-10 minutes until foamy.
- 2. Combine Wet & Dry: Add remaining granulated sugar, melted butter, egg, salt, and cocoa powder to the yeast mixture. Whisk well. Gradually add flour, mixing until a shaggy dough forms. Stir in chocolate chips.
- 3. Knead Dough: Turn dough onto a lightly floured surface. Knead for 5-7 minutes until smooth and elastic.
- 4. First Rise: Place dough in a lightly greased bowl, cover with plastic wrap, and let rise in a warm place for 1-1.5 hours, or until doubled.
- 5. Shape & Second Rise: Punch down dough, divide into 12 equal pieces, and roll into balls. Arrange in a greased 9×13 inch baking pan. Cover and let rise for 30-45 minutes.
- 6. Bake & Cool: Preheat oven to 375°F (190°C). Bake for 18-22 minutes, or until golden brown. Cool in the pan for 5-10 minutes, then transfer to a wire rack to cool completely.
- Prep Time: 25 mins
- Cook Time: 20 mins