
Table of Contents
- Introduction to Authentic Italian Chocolate Cookies
- Ingredients for Italian Chocolate Cookies & Smart Substitutions
- Step-by-Step Instructions: Baking Italian Chocolate Cookies
- Expert Tips for Perfect Italian Chocolate Cookies
- What to Serve with Your Italian Chocolate Cookies
- Storing and Reheating Best Practices
- Frequently Asked Questions (FAQ) About Italian Chocolate Cookies
Introduction to Authentic Italian Chocolate Cookies
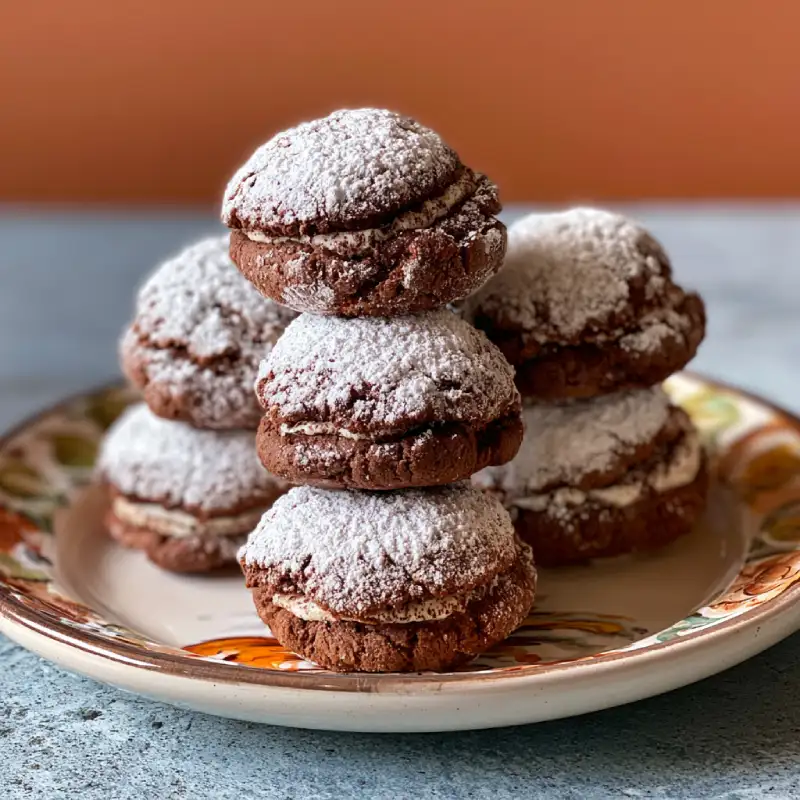
There’s something truly magical about biting into an authentic Italian chocolate cookie. That delightful crunch on the outside, followed by a soft, chewy, and intensely chocolatey interior, often with a hint of espresso or a delicate orange zest. These aren’t just cookies; they’re a mini-vacation to an Italian nonna’s kitchen, a comforting hug in edible form. The rich aroma filling your home as they bake is a promise of pure bliss, and the joy of sharing them with loved ones is simply unparalleled. If you’re looking to elevate your baking game and impress everyone with a truly special treat, these italian chocolate cookies are an absolute must-try. See more good recipes here .
Why I Love These Italian Chocolate Cookies
I genuinely adore these italian chocolate cookies for their irresistible balance of deep chocolate flavor and a delicate, almost cake-like texture. They strike the perfect note between traditional Italian baked goods and a universally beloved chocolate treat. Each cookie is a testament to simple, high-quality ingredients coming together to create something truly extraordinary.
Why This Recipe Works
- Melted Butter for Moisture and Ease: This recipe uses melted butter, which not only makes the mixing process incredibly straightforward (no need to wait for butter to soften!) but also contributes to a wonderfully moist and tender crumb that stays fresh longer.
- Dutch-Processed Cocoa for Deep Color and Flavor: Opting for a quality Dutch-processed cocoa powder is key. It creates that beautiful, dark chocolate hue and a richer, less acidic chocolate flavor that is hallmarks of excellent italian chocolate cookies.
- Perfect Balance of Sweetness: The sugar content is carefully calibrated to enhance the chocolate without making the cookies overly sweet, allowing the true cocoa flavor to shine through.
- No-Fuss Crinkle Top: The combination of chilling and rolling in icing sugar guarantees those classic, appealing crinkled tops that are so characteristic of these beautiful cookies.
Ingredients for Italian Chocolate Cookies & Smart Substitutions
Here is what you need to create these delectable italian chocolate cookies, along with some insights into why each ingredient is important and potential smart substitutions.
Flour: Type and Purpose: I recommend using all-purpose flour (plain flour). It provides the perfect structure without making the cookies tough. If you prefer a slightly lighter, more delicate crumb, you can substitute about 2 tablespoons of all-purpose flour for cornstarch (cornflour) in the recipe, which helps tenderize the dough. For gluten-free, see the FAQ section below!
Cocoa Powder: The Flavor Star: This is where your cookies get their intense chocolate personality! Use a high-quality Dutch-processed cocoa powder (like King Arthur Baking’s Dutch Processed Cocoa). It’s less acidic than natural cocoa and delivers a darker color and smoother, mellower chocolate flavor that’s perfect for these cookies. Do not substitute natural cocoa powder if you can avoid it, as it will affect the overall taste and color significantly due to different acid levels that interact with leavening agents.
Sugar: Sweetness and Texture: We use granulated sugar in the dough. It not only provides sweetness but also contributes to the cookie’s texture and helps create that desirable crinkled surface. You’ll also need icing sugar (powdered sugar/confectioners sugar) for rolling the cookies, which creates the beautiful contrasting finish and adds another layer of delicate sweetness.
Fats: Butter vs. Oil: Unsalted butter is my preference here. Melting it before incorporating ensures even distribution and contributes to the moist, tender texture. While vegetable oil could technically be used, butter adds unparalleled flavor and richness that defines these cookies. If using salted butter, reduce the added salt by half.
Eggs: Binding and Richness: Large eggs act as a binder, helping to hold the dough together, and contribute to the richness and moistness of the cookies. Always ensure your eggs are at room temperature for better emulsification with other ingredients.
Leavening Agents: Rise and Spread: A combination of baking powder and baking soda is used. Baking powder helps the cookies puff up, while baking soda reacts with the slight acidity in cocoa (even Dutch-processed has some, and our other ingredients contribute to it) to create a tender crumb and aid in spread, contributing to the crinkle effect.
Flavorings: Vanilla and Espresso: Pure vanilla extract is essential for rounding out the flavors. For an extra punch of chocolate flavor, I love adding a teaspoon of espresso powder or instant coffee granules. It doesn’t make the cookies taste like coffee, but rather intensifies the chocolate notes. A tiny pinch of sea salt also enhances all the flavors.
Icing Sugar: The Signature Finish: As mentioned, icing sugar (powdered sugar) is crucial for rolling the dough balls before baking. This creates the iconic white coating that cracks during baking, giving these italian chocolate cookies their distinct crinkled appearance.
Step-by-Step Instructions: Baking Italian Chocolate Cookies
Follow these simple steps for perfectly delicious italian chocolate cookies every time!
1. Prepare Your Workspace
Begin by lining two baking sheets with parchment paper or silicone baking mats. This prevents sticking and ensures even baking. Preheat your oven to 350°F (175°C). Have all your ingredients measured out and at the ready – this is called ‘mise en place’ and makes baking so much smoother!
2. Combine Dry Ingredients
In a medium bowl, whisk together the all-purpose flour, Dutch-processed cocoa powder, baking powder, baking soda, espresso powder (if using), and salt. Whisking ensures all the dry ingredients are evenly distributed, preventing pockets of leavener in your final cookies.
3. Cream Wet Ingredients & Form the Dough
In a large bowl, whisk or use an electric mixer to combine the melted unsalted butter and granulated sugar until well combined. Beat in the eggs one at a time, ensuring each is fully incorporated before adding the next. Stir in the pure vanilla extract. Gradually add the dry ingredient mixture to the wet ingredients, mixing on low speed or by hand until just combined. Be careful not to overmix the dough at this stage; overmixing develops gluten, which can lead to tough cookies.
4. Chill the Dough (Why It Matters)
Cover the bowl of dough with plastic wrap and refrigerate for at least 30 minutes, or up to 2 hours. Chilling the dough solidifies the butter, which prevents the cookies from spreading too much in the oven, leading to a thicker, chewier cookie. It also allows the flavors to meld and makes the dough easier to handle.
5. Shape and Coat the Cookies
Once chilled, scoop out dough portions using a small cookie scoop (about 1.5 tablespoons) and roll them into smooth balls between your palms. Place a generous amount of icing sugar in a shallow bowl. Roll each dough ball thoroughly in the icing sugar, ensuring it’s completely coated. You can even double-roll for an extra thick coating, which enhances the crinkle effect. Place the coated balls about 2 inches apart on the prepared baking sheets.
6. Bake to Perfection
Bake the cookies for 10-12 minutes. The cookies are done when the edges are set and slightly firm, but the centers still look a little soft. They will continue to set as they cool on the baking sheet. Do not overbake, or they will lose their signature chewy texture. Let them cool on the baking sheets for 5 minutes before transferring them to a wire rack to cool completely.
Expert Tips for Perfect Italian Chocolate Cookies
- Don’t Overmix the Dough: After adding the dry ingredients, mix just until no streaks of flour remain. Overmixing develops gluten, which can make your italian chocolate cookies tough instead of tender and chewy.
- Achieving the Perfect Crinkle: The key to those beautiful crinkles is a proper chill time and a generous coating of icing sugar. Don’t skimp on the sugar coating – it’s what beautifully cracks as the cookies bake and expand.
- Temperature Control is Key: Ensure your oven is preheated to the correct temperature. An accurate oven thermometer can be a great investment. Also, chilling the dough is non-negotiable for preventing excessive spread.
- Batch Baking Strategies: If baking multiple batches, keep the unbaked dough chilled in the refrigerator between batches. This maintains the consistency needed for the perfect crinkle and prevents excessive spreading.
- Quality Ingredients Matter: Using good quality cocoa powder and pure vanilla extract truly makes a difference in the depth of flavor of your italian chocolate cookies.
What to Serve with Your Italian Chocolate Cookies
These exquisite italian chocolate cookies are wonderful on their own, but pairing them with the right beverage or accompaniment can elevate the experience even further.
Coffee Pairings
A strong, dark roast espresso or a rich cappuccino is a classic Italian pairing. The bitterness of the coffee beautifully contrasts and enhances the sweetness and deep chocolate flavor of the cookies. For a milder option, a robust drip coffee also works wonders.
Dessert Wine Suggestions
For a sophisticated after-dinner treat, consider pairing these cookies with a glass of Vin Santo or a rich, dark ruby port. The sweet, complex notes of these dessert wines complement the chocolate without overpowering it.
After-Dinner Treats
These cookies are also fantastic alongside a scoop of vanilla bean gelato or a dollop of freshly whipped cream. For a truly indulgent experience, dunk them into a small glass of chilled milk.
Storing and Reheating Best Practices
To keep your delicious italian chocolate cookies fresh and enjoyable, follow these storage and reheating guidelines.
Room Temperature Storage
Once completely cooled, store your Italian chocolate cookies in an airtight container at room temperature for up to 5-7 days. While they are at their best in the first few days, they maintain their moisture and flavor remarkably well. Placing a slice of bread in the container can help keep them soft, though it’s often not necessary with this moist recipe.
Freezing Baked Cookies
These cookies freeze beautifully! Once completely cooled, place them in a single layer on a baking sheet and freeze until solid (about 1-2 hours). Then, transfer the frozen cookies to a freezer-safe airtight container or heavy-duty freezer bag. They can be stored for up to 2-3 months. Freezing them individually first prevents them from sticking together.
Reheating for Freshness
To enjoy frozen cookies, simply let them thaw at room temperature for an hour or two. If you desire that freshly baked warmth, you can pop them in a preheated oven at 275°F (135°C) for 5-7 minutes, or briefly microwave them for 10-15 seconds. This little trick works wonders for room temperature cookies too, bringing back some of that irresistible gooeyness.
Frequently Asked Questions (FAQ) About Italian Chocolate Cookies
Can I make these cookies gluten-free?
Why are my cookies flat?
How can I add different flavors?
Are these cookies good for gifting?
Authentic Italian Chocolate Cookies
- Total Time: 32 minutes
- Yield: 24 cookies
Description
Discover how to make the best italian chocolate cookies with our step-by-step easy to bake recipe. Experience authentic Italian flavors with these rich, crinkled delights!
Ingredients
- 1 cup (226g) unsalted butter, melted
- 1 ½ cups (300g) granulated sugar
- 2 large eggs, room temperature
- 1 teaspoon pure vanilla extract
- 2 cups (240g) all-purpose flour
- ¾ cup (75g) Dutch-processed cocoa powder
- 1 teaspoon baking soda
- ½ teaspoon baking powder
- 1 teaspoon espresso powder (optional, but recommended)
- ½ teaspoon fine sea salt
- 1 cup (120g) icing sugar (powdered sugar), for coating
Instructions
- 1. Prepare: Line two baking sheets with parchment paper. Preheat oven to 350°F (175°C).
- 2. Combine Dry: In a medium bowl, whisk together flour, cocoa powder, baking soda, baking powder, espresso powder (if using), and salt.
- 3. Combine Wet: In a large bowl, whisk melted butter and granulated sugar. Beat in eggs one at a time, then stir in vanilla.
- 4. Form Dough: Gradually add dry ingredients to wet, mixing until just combined. Do not overmix.
- 5. Chill: Cover and refrigerate dough for 30 minutes to 2 hours.
- 6. Shape & Coat: Scoop 1.5-tablespoon portions of dough. Roll into balls, then coat generously in icing sugar. Place on prepared baking sheets 2 inches apart.
- 7. Bake: Bake for 10-12 minutes, or until edges are set but centers are still slightly soft. Let cool on baking sheets for 5 minutes before transferring to a wire rack to cool completely.
- Prep Time: 20 mins
- Cook Time: 12 mins