
Table of Contents
- Introduction: Your New Go-To Vanilla Cake
- How This Recipe Works: The Science of a Tender Crumb
- Ingredients and Smart Substitutions: What You Need and Why
- Step-by-Step Instructions: Your Visual Baking Guide
- Expert Tips for Success: Avoiding Common Cake Pitfalls
- What to Serve With Your Vanilla Pudding Cake
- Storing and Reheating Your Vanilla Cake
- Frequently Asked Questions About Vanilla Pudding Cake
Introduction: Your New Go-To Vanilla Cake
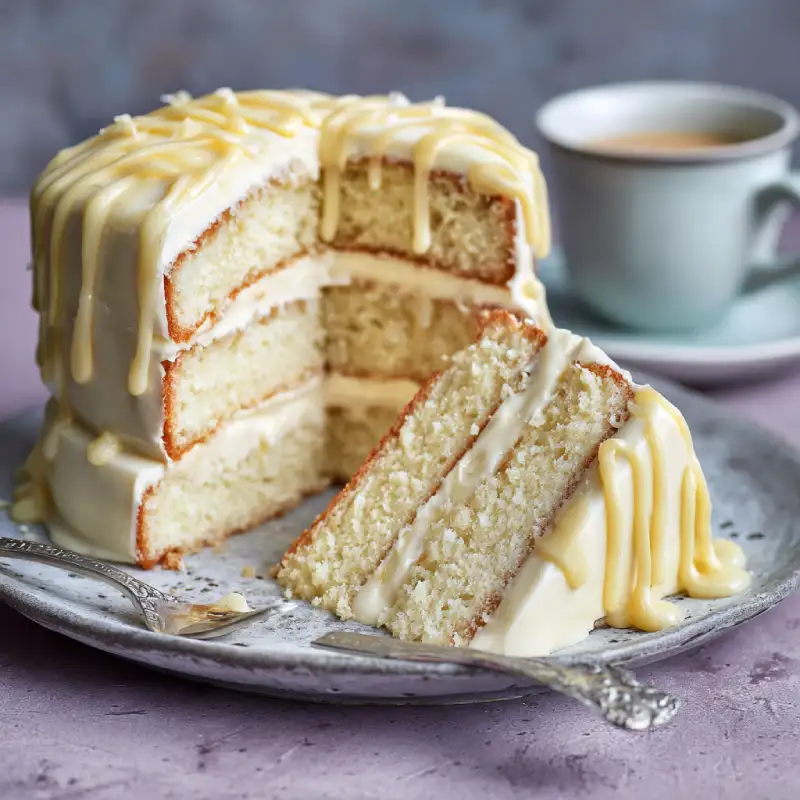
Prepare yourselves, baking enthusiasts, for a vanilla cake experience that will redefine your expectations. This isn’t just any vanilla cake; it’s the culmination of countless trials and triumphs, delivering a moist, tender crumb and an unparalleled depth of vanilla flavor that will make you swoon. The secret? Instant vanilla pudding mix, which transforms an already delicious cake into an extraordinary one. Its delicate texture melts in your mouth, while the rich, aromatic vanilla notes linger pleasantly, making every bite a pure moment of joy. See more easy recipes, but let me tell you, this one is a true gem. This vanilla cake recipe with vanilla pudding is about to become your signature bake, the one everyone requests for birthdays, celebrations, or just because.
Why This Vanilla Pudding Cake is a Game Changer
For years, I chased the elusive perfect vanilla cake. I experimented with different flours, fat ratios, and leavening agents. But it wasn’t until I introduced the humble instant vanilla pudding mix that everything clicked. The pudding acts as a moisture magnate, ensuring a cake that stays incredibly moist for days, unlike many vanilla cakes that can dry out too quickly. It also subtly enhances the vanilla flavor, making it richer and more pronounced without being cloyingly sweet. This recipe consistently delivers a perfectly domed, golden-brown cake with an unbelievably tender crumb – a true triumph in the world of home baking.
My Journey to the Perfect Vanilla Cake
My baking journey began with a persistent quest for that quintessential bakery-style vanilla cake – moist, flavorful, and robust enough to hold up to frosting and festivities. I remember countless failed attempts: dense cakes, crumbly cakes, cakes that tasted more of flour than vanilla. The turning point came when a wise, seasoned baker suggested adding pudding mix. Sceptical at first, I soon realized the genius of it. The pudding mix wasn’t just a shortcut; it was a scientific secret weapon. After refining the ratios of dairy, sugar, and leavening, this vanilla cake recipe with vanilla pudding emerged, a testament to perseverance and the power of a single, brilliant ingredient.
How This Recipe Works: The Science of a Tender Crumb
- Pudding for Unbeatable Moisture and Flavor: The starches in instant pudding mix not only absorb and retain moisture, keeping the cake incredibly soft and tender for longer, but also amplify the vanilla flavor, making it richer and more authentic.
- Balancing Sweetness for a Perfect Bite: We carefully balance the sugar content, ensuring the cake is sweet enough to be decadent without being overpowering, letting the true vanilla flavor shine through.
- Achieving a Delicate Yet Sturdy Structure: The precise ratio of butter, eggs, and leavening agents, combined with the structural support from the pudding, creates a cake with a fine, delicate crumb that is still sturdy enough for stacking and decorating.
- Creaming Method for Maximum Airiness: Our technique of creaming butter and sugar together incorporates air, which contributes to the cake’s light texture and helps it rise beautifully.
Ingredients and Smart Substitutions: What You Need and Why
Here is what you need and why:
Dry Ingredients: Flour, Sugars, Leavening, Salt:
- All-purpose flour: I prefer unbleached all-purpose flour for its consistent performance. It provides the cake’s primary structure. While you can substitute cake flour for an even finer, more delicate crumb, all-purpose works beautifully here.
- Granulated Sugar: Essential for sweetness and also helps with moisture retention.
- Baking Powder & Baking Soda: Our leavening duo! Baking powder provides initial lift, while baking soda reacts with the acidic sour cream to give an extra boost and tenderize the crumb.
- Salt: Don’t skip the salt! It perfectly balances the sweetness and enhances all the other flavors.
Wet Ingredients: The Dairy Duo (Milk + Sour Cream/Yogurt):
- Whole Milk: Adds moisture and richness. Full-fat milk is recommended for the best flavor and texture.
- Sour Cream (or Plain Whole Milk Yogurt): This is a game-changer! Its acidity reacts with the baking soda for a tender crumb and adds incredible moisture and a slight tang that complements the vanilla beautifully. Full-fat options are always preferred.
Flavor Boosters: Vanilla Extract and Vanilla Pudding Mix:
- Pure Vanilla Extract: Use the best quality you can find. It’s a vanilla cake, after all! Don’t skimp here.
- Instant Vanilla Pudding Mix (NOT Cook & Serve): This is our secret weapon! It adds astonishing moisture, enhances vanilla flavor, and contributes to the cake’s tender crumb. A 3.4 oz (small) box is perfect. Jell-O Instant Vanilla Pudding is a reliable choice.
Fat Source: Butter vs. Oil Considerations:
- Unsalted Butter: I specify unsalted so we can control the salt content. Butter provides rich flavor and contributes to the cake’s structure and browning. Ensure it’s at perfect room temperature for proper creaming.
Egg’s Role: Structure and Richness:
- Large Eggs: They provide emulsification, moisture, richness, and contribute significantly to the cake’s structure. Again, room temperature is crucial for proper incorporation.
Step-by-Step Instructions: Your Visual Baking Guide
Follow these step-by-step photos:
1. Prepare Your Pans and Preheat Oven
Preheat your oven to 350°F (175°C). Grease and flour two 8-inch or 9-inch round cake pans, or line them with parchment paper. This crucial first step ensures your beautiful cakes won’t stick, providing a clean release. Don’t skip this! A perfectly prepped pan is your first step to baking success.
2. Combine Dry Ingredients Properly
In a medium bowl, whisk together the all-purpose flour, granulated sugar, baking powder, baking soda, and salt. Whisking ensures all leavening agents and salt are evenly distributed throughout the flour, which is vital for an even rise and flavor. You want no lumps here, so whisk well for about 30 seconds.
3. Cream Butter and Sugar for Airiness
In a large bowl, using an electric mixer, cream together the softened unsalted butter and sugar on medium-high speed for 3-5 minutes, until light, fluffy, and pale in color. This step is essential for incorporating air into the batter, which contributes to the cake’s light and tender crumb. Scrape down the sides of the bowl often.
4. Add Eggs Gradually
Beat in the large eggs one at a time, mixing well after each addition until fully incorporated. Then, stir in the pure vanilla extract. Adding eggs gradually allows them to emulsify properly with the butter-sugar mixture, creating a stable batter. The batter may look slightly curdled after the first egg, but it will come together.
5. Alternate Dry and Wet Ingredients
In a separate bowl, whisk together the whole milk and sour cream. With the mixer on low speed, alternately add the dry ingredients and the wet ingredients to the butter mixture, beginning and ending with the dry. Mix until just combined after each addition. Do not overmix!
6. Fold in Pudding Mix Gently
Gently fold in the instant vanilla pudding mix into the batter until just incorporated. A spatula is best for this to avoid overmixing. The pudding mix will quickly dissolve and integrate, adding its magical moisture and flavor to the batter.
7. Bake Until Golden and Set
Divide the batter evenly between the prepared cake pans. Bake for 30-35 minutes, or until a wooden skewer inserted into the center comes out clean. The cakes should be golden brown and spring back lightly when touched.
8. Cooling Process for Texture Integrity
Let the cakes cool in their pans on a wire rack for 10-15 minutes before inverting them onto the rack to cool completely. This gradual cooling prevents the cakes from sinking and ensures their delicate structure remains intact. Frost only when completely cool!
Expert Tips for Success: Avoiding Common Cake Pitfalls
- Measure Ingredients Accurately (Weight vs. Volume): For consistent results, especially with flour, invest in a digital kitchen scale and measure by weight. If using volume, spoon flour into your measuring cup and level it off; never scoop directly from the bag.
- Room Temperature Ingredients: A Must for Emulsification: Butter, eggs, milk, and sour cream should all be at proper room temperature. This allows them to combine smoothly, creating a homogeneous batter that holds air better for a lighter, more tender cake.
- Do Not Overmix the Batter: Overmixing develops the gluten in the flour, leading to a tough, dense cake. Mix only until the ingredients are just combined. A few small lumps are perfectly fine.
- Know Your Oven: Calibrate if Necessary: Ovens can vary significantly. An oven thermometer is an inexpensive tool that can save your bakes. If your cakes consistently bake too fast or too slow, consider calibrating your oven.
- Testing for Doneness: The Toothpick Test: Insert a wooden skewer or toothpick into the center of the cake. If it comes out clean or with a few moist crumbs attached (but no wet batter), your cake is done.
- Cooling Completely Before Frosting: Tempting as it is, do not frost a warm cake! The frosting will melt and slide right off. Allow the cake layers to cool completely on a wire rack for at least 2-3 hours.
What to Serve With Your Vanilla Pudding Cake
This magnificent vanilla cake recipe with vanilla pudding is a star on its own, but here are some delightful pairings to truly elevate the experience:
- Classic Buttercream Variations: A silky vanilla bean buttercream is always a winner. Or, get creative with a delicate lemon buttercream for a zesty contrast, or a raspberry buttercream for a fruity twist.
- Fresh Fruit Pairings: The simplicity of fresh berries (strawberries, raspberries, blueberries) tossed with a tiny bit of sugar perfectly complements the rich vanilla. Sliced peaches or even a light fruit compote would also be divine.
- Simple Glazes for Less Sweet Options: For those who prefer a less sweet finish, a simple vanilla glaze made with powdered sugar, milk, and a touch of vanilla extract is elegant and delicious.
- Coffee or Tea: A good cup of coffee, a delicate Earl Grey, or a robust black tea makes for an excellent companion, cutting through the sweetness and enhancing the cake’s flavors.
Storing and Reheating Your Vanilla Cake
Thanks to the vanilla pudding mix, this cake stays incredibly fresh and moist for days! Here’s how to ensure it remains delicious:
- Room Temperature Storage Guidelines: If unfrosted, wrap individual layers tightly in plastic wrap. If frosted, store the entire cake under a cake dome or in an airtight container at room temperature for up to 2-3 days. Avoid direct sunlight or heat sources.
- Refrigeration for Extended Freshness: For longer storage, especially if your frosting contains dairy (like cream cheese frosting), refrigerate the cake in an airtight container. It will last for up to 5-7 days. Bring slices to room temperature for about 30 minutes before serving for the best texture and flavor.
- Freezing Baked Cake Layers: This cake freezes beautifully! Once completely cooled, wrap unfrosted cake layers tightly in plastic wrap, then an additional layer of aluminum foil. Freeze for up to 2-3 months. To thaw, unwrap the layers and let them come to room temperature on a wire rack before frosting.
Frequently Asked Questions About Vanilla Pudding Cake
Can I use instant pudding mix?
What if I don’t have sour cream?
How do I prevent my cake from sinking?
Can I make cupcakes with this recipe?
Is this cake good for stacking?
Delicious Vanilla Cake with Vanilla Pudding
- Total Time: 51 minute
- Yield: 12-16 servings
Description
Unlock the secret to the ultimate moist and flavorful vanilla cake with this incredible recipe featuring instant vanilla pudding. This easy-to-follow guide guarantees a tender crumb and rich vanilla taste every single time.
Ingredients
- 2 ½ cups (300g) all-purpose flour
- 1 ½ cups (300g) granulated sugar
- 1 tablespoon baking powder
- ½ teaspoon baking soda
- ¾ teaspoon salt
- 1 cup (226g) unsalted butter, softened
- 4 large eggs, room temperature
- 2 teaspoons pure vanilla extract
- 1 cup (240ml) whole milk, room temperature
- ½ cup (120g) full-fat sour cream or Greek yogurt, room temperature
- 1 (3.4 oz) box instant vanilla pudding mix (Jell-O brand recommended)
Instructions
- Step 1: Prepare Pans & Preheat Oven. Preheat oven to 350°F (175°C). Grease and flour two 8-inch or 9-inch round cake pans, or line with parchment paper.
- Step 2: Combine Dry Ingredients. In a medium bowl, whisk together flour, granulated sugar, baking powder, baking soda, and salt.
- Step 3: Cream Butter and Sugar. In a large bowl, cream softened butter and sugar with an electric mixer on medium-high speed for 3-5 minutes until light and fluffy.
- Step 4: Add Eggs and Vanilla. Beat in eggs one at a time, mixing well after each. Stir in vanilla extract.
- Step 5: Alternate Dry and Wet. In a separate bowl, whisk milk and sour cream. With mixer on low, alternately add dry ingredients and wet ingredients to butter mixture, beginning and ending with dry. Mix until just combined.
- Step 6: Fold in Pudding Mix. Gently fold the instant vanilla pudding mix into the batter until just incorporated using a spatula; do not overmix.
- Step 7: Bake Cake. Divide batter evenly between prepared pans. Bake for 30-35 minutes, or until a wooden skewer inserted into the center comes out clean.
- Step 8: Cool Completely. Let cool in pans for 10-15 minutes, then invert onto a wire rack to cool completely before frosting.
- Prep Time: 20 mins
- Cook Time: 30-35 mins