
Table of Contents
- Introduction: Why Tart Cherries Belong in Your Kitchen
- How These Tart Cherry Recipes Work: Flavor and Texture Unpacked
- Essential Ingredients and Smart Substitutions for Tart Cherry Baking
- Step-by-Step Guide: Crafting Your Tart Cherry Masterpiece
- Expert Tips for Tart Cherry Baking Success
- What to Serve with Your Tart Cherry Creations
- Storing and Reheating Your Tart Cherry Bakes
- Frequently Asked Questions About Tart Cherry Baking
Introduction: Why Tart Cherries Belong in Your Kitchen
There’s a special kind of magic that happens when you bite into a baked good brimming with tart cherries. That initial burst of bright, tangy flavor, followed by a subtle sweetness and the satisfying chew of the fruit – it’s an experience that truly awakens the senses. As an expert food blogger and passionate home baker, I’ve spent countless hours perfecting See more good recipes here that celebrate these ruby-red gems, transforming them into delicious pies, tarts, crumbles, and more. Trust me, once you master the art of baking with tart cherries, your kitchen will never be the same. The contrast they offer, especially in rich, buttery pastries, is unparalleled, creating desserts that are both comforting and exhilarating in every mouthful. These tart cherry recipes are designed to bring out the very best in this incredible fruit.
My Journey with Tart Cherries: From Orchard to Oven
My love affair with tart cherries began on a sun-drenched day in Michigan, picking Montmorency cherries straight from the tree. The intense sourness balanced by a faint sweetness was intoxicating. From that moment, I was hooked. I brought bushels home, experimenting endlessly to capture that vibrant flavor in baked forms. It wasn’t just about the taste; it was about the challenge of balancing their inherent tartness with just the right amount of sugar, creating bakes that sing with natural fruit essence rather than being sugar-laden.
The Unique Appeal of Tart Cherries in Baking
Unlike their sweeter counterparts, tart cherries bring a fantastic complexity to baking. They cut through richness, add a beautiful acidity, and maintain their shape and integrity through the baking process, infusing every bite with concentrated fruit flavor. They’re not just an ingredient; they’re the star, demanding attention and delivering a truly memorable experience.
How These Tart Cherry Recipes Work: Flavor and Texture Unpacked
These tart cherry recipes aren’t just a collection; they’re a masterclass in understanding and manipulating the unique properties of this fruit. We’re going beyond simply mixing ingredients.
Achieving the Perfect Balance of Sweet and Tart
The secret lies in understanding the natural acidity of tart cherries. We don’t want to completely mask it, but rather to complement it. Recipes here use precise measurements of sweeteners, often combining different types, to enhance the cherry’s natural flavor without making it cloyingly sweet. It’s about a harmonious dance between the two.
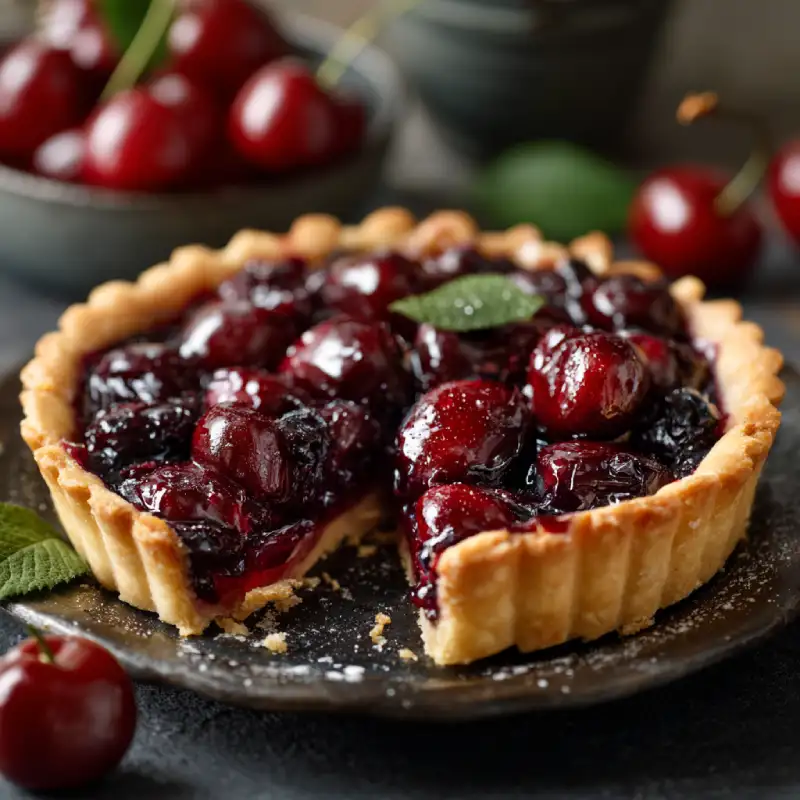
Ensuring Optimal Texture: From Crisp to Jammy
Nobody wants a watery pie filling or a dry crumble. My methods focus on techniques that ensure your tart cherry bakes have the perfect texture – a thick, glossy, and slightly jammy interior for pies and tarts, and a delightful contrast of crisp toppings for crumbles and crisps. It’s all about careful heat management and the right thickeners.
Leveraging Natural Cherry Juices for Depth of Flavor
That beautiful crimson juice that tart cherries release during baking? It’s liquid gold! These recipes are crafted to harness that natural juice, thickening it into a rich, flavorful sauce that coats every cherry, intensifying the overall taste profile and adding incredible depth. We don’t discard it; we celebrate it.
Essential Ingredients and Smart Substitutions for Tart Cherry Baking
Here is what you need and why:
Fresh vs. Frozen Tart Cherries: What to Know: While fresh tart cherries (like Montmorency) are a seasonal delight, high-quality IQF (individually quick frozen) tart cherries are an excellent, convenient, and often more accessible option. When using frozen, thaw them first and drain any excess liquid to prevent a watery filling. Don’t skip this critical step! It directly impacts the final texture of your tart cherry recipes.
Sweeteners: Granulated, Brown Sugar, and Maple Syrup – The ‘Why’: Granulated sugar provides clean sweetness, allowing the cherry flavor to shine. Brown sugar adds a deeper, molasses-y note and a touch of moisture, particularly wonderful in crumbles. Maple syrup can introduce an earthy complexity and is a great natural alternative to refined sugars. The choice depends on the desired flavor profile and the specific tart cherry recipes you’re tackling.
Thickeners: Cornstarch vs. Flour – Choosing Wisely: Cornstarch creates a glossy, clear filling, perfect for showcasing the cherries’ vibrant color in pies and tarts. Flour provides a more opaque, sturdy filling, often preferred in crumbles where it absorbs more moisture. King Arthur Baking has some great insights into fruit fillers. Using the right thickener is crucial for achieving that ideal consistency that defines excellent tart cherry recipes.
Flavor Boosters: Almond Extract, Vanilla, and Spices: Almond extract is a classic companion to cherries, enhancing their fruity notes beautifully. Just a touch works wonders. Vanilla extract adds warmth and depth, rounding out the flavors. Consider a pinch of cinnamon or even a tiny grating of fresh nutmeg for an extra layer of spice, especially in rustic bakes. These subtle additions elevate good tart cherry recipes to extraordinary.
How to Make Your Tart Cherry Masterpiece
Follow these step-by-step instructions to create your perfect tart cherry bake:
1. Preparation: Pitting and Prepping Your Cherries
If using fresh cherries, pit them thoroughly. A cherry pitter makes quick work of this, but a chopstick or even a sturdy paperclip can do the trick in a pinch. For frozen cherries, thaw them completely in a colander set over a bowl to catch any excess juice, then lightly pat them dry with paper towels.
2. Filling Assembly: Combining Cherries with Sweeteners and Thickeners
In a large bowl, gently toss your prepared tart cherries with your chosen sugar(s), thickener (cornstarch or flour), and any flavor boosters like almond extract or spices. Mix until the cherries are evenly coated. Let this mixture sit for 10-15 minutes; this allows the sugar to draw out some of the cherry juices, helping the thickener activate properly during baking.
3. Crust or Topping: Easy Pastry Dough or Crumb Topping Instructions
For pies or tarts, roll out your favorite pie crust and gently fit it into your pie plate. For crumbles or crisps, prepare your crumb topping by combining flour, oats, sugar, and cold butter until crumbly. Distribute it evenly over the cherry filling.
4. Baking Process: Temperature, Time, and Doneness Cues
Preheat your oven to the recommended temperature (usually 375-400°F). Place your assembled tart cherry dessert on a baking sheet (to catch any potential spills) and bake. Baking time will vary depending on the recipe (pie vs. crumble). Look for a bubbling, thickened filling and a golden-brown crust or topping. A good sign of doneness for pies is when the filling is visibly bubbling in the center.
Expert Tips for Tart Cherry Baking Success
- Preventing Soggy Bottoms in Pies and Tarts: Blind bake your pie crust before adding the filling. A thin layer of breadcrumbs or crushed cereal sprinkled on the bottom crust before adding the filling can also act as a moisture barrier.
- Achieving a Golden, Evenly Baked Crust: For pies, tent the edges of your crust with foil during the last third of baking to prevent over-browning while allowing the center to catch up. An egg wash (egg yolk whisked with a tablespoon of water) applied before baking gives a beautiful shine and even browning.
- Troubleshooting Common Tart Cherry Baking Issues: If your filling isn’t thickening, it might need more time to bake, or perhaps slightly more thickener next time. If it’s too thick, you might have over-thickened or baked too long. Remember, practice makes perfect!
- Don’t Overmix the Filling: Gentle handling of the cherries helps them maintain their shape and prevents them from breaking down too much before baking.
- Chill Your Dough: For pie crusts, ensure your dough is well-chilled before rolling and baking. This helps prevent shrinkage and results in a flakier crust.
What to Serve with Your Tart Cherry Creations
A delicious tart cherry bake is often a meal in itself, but a few simple additions can elevate the experience even further.
Classic Pairings: Vanilla Ice Cream and Whipped Cream
The cool creaminess of a scoop of vanilla bean ice cream melting into a warm tart cherry pie or crumble is pure heaven. Similarly, a dollop of freshly whipped cream adds a delicate sweetness and airy texture that beautifully complements the fruit’s brightness.
Savory Counterparts: Pairing with Cheeses
Don’t dismiss savory pairings! A sharp cheddar cheese, particularly with a tart cherry pie, creates a surprisingly delightful contrast. The saltiness and richness of the cheese work wonderfully against the sweet-tart fruit.
Beverage Recommendations: Coffee, Tea, or Wine
For a cozy afternoon treat, pair your tart cherry dessert with a dark roast coffee or a robust black tea. For a more sophisticated evening, a glass of chilled rosé or a light-bodied red wine, such as a Pinot Noir, can beautifully echo the fruit notes in your bake.
Storing and Reheating Your Tart Cherry Bakes
Proper storage ensures your delicious tart cherry creations remain fresh and enjoyable for as long as possible.
Cooling and Room Temperature Storage
Always allow your tart cherry bakes to cool completely before storing. Pies and tarts can typically sit at room temperature for up to 24 hours, loosely covered, especially if they contain no dairy or cream.
Refrigeration for Extended Freshness
For longer storage, refrigerate your tart cherry pies, tarts, and crumbles. Cover them tightly with plastic wrap or aluminum foil. They will stay fresh in the refrigerator for 3-4 days. This is especially important for more delicate bakes or in warmer climates.
Freezing Baked Tart Cherry Goods
Many tart cherry bakes, especially pies and crumbles, freeze beautifully. Once completely cooled, wrap individual slices or the entire dessert tightly in plastic wrap, then an additional layer of aluminum foil. Freeze for up to 2-3 months. Label with the date to keep track.
Best Practices for Reheating
To reheat a whole pie or a larger portion from the refrigerator, place it in a preheated oven at 300-325°F (150-160°C) for 15-25 minutes, or until warmed through. Smaller portions or individual slices can be reheated in a microwave for 30-60 seconds, though the crust won’t be as crisp. For frozen items, thaw overnight in the refrigerator, then reheat as above.
Frequently Asked Questions About Tart Cherry Baking
Can I use canned tart cherries?
Yes, you can, but adjust for sweetness. Canned tart cherries are often packed in water or light syrup. If packed in syrup, reduce the added sugar in your recipe. If packed in water, drain thoroughly and follow the recipe as written for fresh/frozen cherries. Be aware that the texture might be slightly softer than with fresh or frozen.
How do I adjust sweetness for different cherry varieties?
Most tart cherry recipes assume Montmorency cherries. If using a less common, potentially tarter variety, you might want to add an extra tablespoon or two of sugar and taste a small (raw) sample of the filling (without thickeners) to gauge. Conversely, if you find your cherries less tart than expected, you can slightly reduce the sugar.
What’s the best way to prevent cherry juice from overflowing?
A few strategies: use a baking sheet under your pie or tart to catch spills (always a good idea!). Ensure your thickener is incorporated well and the filling isn’t over-juicy initially (drain frozen cherries!). Also, making a few small slits in the top crust of a pie allows steam to escape, which can help prevent excessive bubbling and overflow.
Are there gluten-free or vegan options for these recipes?
Absolutely! For gluten-free versions, substitute all-purpose flour in crusts and crumble toppings with a good quality gluten-free all-purpose baking blend (ensure it contains xanthan gum). For vegan options, replace butter with vegan butter sticks or coconut oil, and swap out any egg washes with plant-based milk or maple syrup for shine. These simple swaps make our tart cherry recipes accessible to everyone.
Classic Tart Cherry Crumble
- Total Time: 1 hour 5 minutes
- Yield: 8 servings
Description
This comforting tart cherry crumble perfectly balances sweet and tart, with a buttery, crispy oat topping. It’s an easy-to-make dessert that’s guaranteed to be a crowd-pleaser.
Ingredients
- 6 cups (about 2.5 lbs) fresh or frozen tart cherries, pitted and thawed
- 1/2 cup granulated sugar (adjust to taste)
- 1/4 cup brown sugar, packed
- 1/4 cup cornstarch
- 1 tsp vanilla extract
- 1/4 tsp almond extract (optional)
- 1/4 tsp ground cinnamon
- Pinch of salt
- For the Crumble Topping:
- 1 cup all-purpose flour
- 1/2 cup rolled oats
- 1/2 cup brown sugar, packed
- 1/4 tsp ground cinnamon
- 1/4 tsp salt
- 1/2 cup (1 stick) cold unsalted butter, cut into small cubes
Instructions
- 1. Prepare Cherries: If using frozen cherries, thaw them completely and drain any excess liquid. In a large bowl, combine the cherries with granulated sugar, brown sugar, cornstarch, vanilla extract, almond extract (if using), cinnamon, and a pinch of salt. Toss gently until the cherries are evenly coated. Set aside for 10-15 minutes.
- 2. Make Crumble Topping: In a separate medium bowl, whisk together the flour, oats, brown sugar, cinnamon, and salt. Add the cold butter cubes. Using your fingertips or a pastry blender, work the butter into the dry ingredients until the mixture resembles coarse crumbs with some pea-sized pieces of butter remaining.
- 3. Assemble: Preheat your oven to 375°F (190°C). Pour the cherry filling into an 8×8 inch baking dish or a 9-inch pie plate. Sprinkle the crumble topping evenly over the cherries.
- 4. Bake: Place the baking dish on a baking sheet to catch any potential drips. Bake for 45-55 minutes, or until the filling is bubbling and the topping is golden brown and crisp. If the topping browns too quickly, loosely tent with foil.
- 5. Cool & Serve: Let the crumble cool for at least 30 minutes before serving. This allows the filling to set. Serve warm with vanilla ice cream or whipped cream.
- Prep Time: 20 mins
- Cook Time: 45 mins