
Table of Contents
- Introduction: Why This Berry Crumbl is a Must-Bake
- How This Recipe Works: Texture and Flavor Achieved
- Ingredients and Smart Substitutions
- Step-by-Step Instructions: Your Visual Walkthrough
- Expert Tips for Ultimate Berry Crumbl Success
- What to Serve With Your Berry Crumbl
- Storing and Reheating Your Crumbl
- Frequently Asked Questions About Berry Crumbl
Introduction: Why This Berry Crumbl is a Must-Bake
There are few desserts that evoke instant comfort and joy quite like a warm, freshly baked berry crumbl. Imagine a symphony of textures and flavors: a gloriously crisp, buttery, streusel topping yielding to a burst of sweet-tart, bubbling berries. It’s a dessert that feels both rustic and refined, perfect for any occasion from a casual weeknight treat to a elegant dinner party. I’ve spent years perfecting this recipe, iterating through countless variations to bring you what I confidently declare to be The Ultimate Berry Crumbl. This isn’t just another recipe; it’s a culmination of passion and precision, ensuring every bite delivers pure culinary bliss. Forget dry, overcooked fruit or soggy toppings – this recipe guarantees a harmonious balance that will leave you craving more. See more easy recipes and get ready to elevate your baking game with this incredible crumbl.
My Journey to the Perfect Berry Crumbl
My baking journey began in my grandmother’s kitchen, where crumbles and crisps were a seasonal staple. While her recipes were undeniably delicious, I’ve always been driven by the pursuit of perfection. Over the years, I experimented with different berry combinations, various levels of sweetness, and, most crucially, the delicate balance of fats and flours in the topping. This particular recipe for The Ultimate Berry Crumbl is the result of countless trials, each one bringing me closer to that elusive ideal: a crumbl that is consistently spectacular, every single time.
What Makes This Recipe Stand Out
This recipe distinguishes itself through thoughtful attention to detail. We’re not just throwing ingredients into a dish; we’re crafting a dessert where every component plays a vital role. From the careful preparation of the berry filling to achieve maximum juiciness without being watery, to the precise ratio of butter and flour in the topping for unparalleled crispness, every step is designed for optimal flavor and texture. It truly is the ultimate expression of a berry crumbl.
How This Recipe Works: Texture and Flavor Achieved
- Crispy, Buttery Crumbl Topping: We achieve this through a specific mixing technique for the topping ingredients, creating distinct clusters that crisp up beautifully in the oven without becoming too sandy or soft. The quality of butter here is paramount.
- Juicy, Sweet-Tart Berry Filling: A careful balance of berries, sugar, and a touch of lemon zest ensures the fruit remains vibrant and flavorful, releasing its delicious juices to create a thick, syrupy base without becoming overly watery or mushy.
- Balanced Sweetness: The sweetness is expertly calibrated to enhance the natural flavor of the berries, rather than overpower it. This allows the inherent tartness of the fruit to shine through, creating a multidimensional taste experience.
Ingredients and Smart Substitutions
Here is what you need and why:
For the Berry Filling: Why Fresh or Frozen Matters
Mixed Berries: For The Ultimate Berry Crumbl, I highly recommend a blend of berries for complexity. Think strawberries, blueberries, raspberries, and blackberries. Fresh berries are fantastic when in season, offering peak sweetness and vibrancy. However, frozen berries work exceptionally well too, and are often more economical out of season. There’s no need to thaw them; just toss them directly into the mixture. Just be aware that frozen berries may release more liquid, which we account for with a touch more thickener.
Granulated Sugar: Sweetens the berries. Adjust to your preference and the natural sweetness of your fruit. You can also use brown sugar for a deeper molasses note.
Cornstarch or All-Purpose Flour: This is our crucial thickener. It prevents the berry filling from becoming too watery. Cornstarch provides a glossy finish, while flour gives a slightly opaque, traditional feel. Both work beautifully.
Lemon Zest (and a squeeze of juice): This isn’t just for flavor; it’s a magic brightener! The lemon cuts through the sweetness and enhances the natural tartness of the berries, making them sing. Don’t skip it!
For the Crumbl Topping: The Role of Butter and Flour
All-Purpose Flour: The foundation of our crispy topping. Use a good quality, unbleached all-purpose flour for the best texture.
Old-Fashioned Rolled Oats: These add a wonderful chewiness and nutty flavor to the topping, contributing significantly to that signature crumbl texture. Quick oats can be used in a pinch, but the texture won’t be quite the same.
Granulated Sugar & Light Brown Sugar: A combination of sugars provides the best of both worlds. Granulated sugar promotes crispness, while light brown sugar adds moisture, a caramel-like depth, and a lovely chewiness. You can adjust the ratio slightly based on desired sweetness and moistness.
Unsalted Butter (cold, cut into cubes): The star of the topping! Using cold butter is absolutely essential for creating those delightful, chunky crumbles. When cold butter bits melt in the oven, they release steam, creating pockets of air that result in a light, crispy texture. If your butter is too warm, you’ll end up with a more cookie-like topping, not the crumbly texture we’re after. For the best quality, I highly recommend using a European-style butter, like grass-fed butter, as its higher fat content contributes to exceptional flavor and flakiness. King Arthur Baking has a fantastic article explaining why cold butter is so important in baking.
Sweeteners: Granulated Sugar vs. Alternatives
While granulated sugar is standard, you can experiment with alternatives like coconut sugar (for a slightly caramel flavor) or maple sugar. Be aware that these may alter the moisture content and overall sweetness, so you might need to adjust quantities.
Flavor Boosters: Lemon Zest and Vanilla Extract
Vanilla Extract: A touch of pure vanilla extract in the topping adds a warm, aromatic depth that complements the berries beautifully.
Cinnamon/Nutmeg (optional): For an extra layer of warmth, especially in colder months, a pinch of cinnamon or nutmeg can be a delightful addition to the topping.
Step-by-Step Instructions: Your Visual Walkthrough
Follow these step-by-step photos:
1. Prepare the Berry Filling
In a large bowl, gently combine your chosen mixed berries with the granulated sugar, cornstarch (or flour), and lemon zest. Toss carefully to coat the berries without crushing them. The cornstarch will help thicken the juices as they cook, and the lemon brightens the flavors. Set aside while you make the topping. Preheat your oven to 375°F (190°C).
2. Make the Crumbl Topping
In a separate large bowl, whisk together the all-purpose flour, old-fashioned rolled oats, granulated sugar, light brown sugar, and a pinch of salt. Add the cold, cubed unsalted butter. Using your fingertips, a pastry blender, or a stand mixer with the paddle attachment, work the butter into the dry ingredients. Mix until the mixture resembles coarse crumbs with some pea-sized pieces of butter still visible. It’s crucial not to overmix; these distinct pieces of butter are what create that signature crispy, flaky texture. Finally, stir in the vanilla extract.
3. Assemble the Crumbl
Pour the prepared berry filling into an ungreased 9×13 inch baking dish (or an equivalent sized round dish, like a 9-inch pie dish for a thicker crumbl). Spread the berries evenly. Evenly sprinkle the crumbl topping over the berry mixture, ensuring it covers most of the fruit but doesn’t necessarily create a solid layer. You want some gaps for the juices to bubble through and for the topping to get perfectly crisp.
4. Bake to Golden Perfection
Place the baking dish on a baking sheet (to catch any potential overflow) and bake in the preheated oven for 40-50 minutes. The crumbl is done when the topping is golden brown and delightfully crisp, and the berry filling is bubbling vigorously around the edges and through the gaps in the topping. The fruit should be tender when pierced with a knife. Allow it to cool slightly before serving.
Expert Tips for Ultimate Berry Crumbl Success
- Don’t Overmix the Crumbl Topping: Overmixing develops gluten and melts the butter, which leads to a tough, cake-like topping instead of a light, crumbly texture. Aim for coarse crumbs with visible butter pieces.
- Choosing Your Berries Wisely: While fresh is ideal when in season, don’t shy away from using frozen berries. Just be sure to not thaw them beforehand to prevent excessive moisture. A mix of sweet and tart berries provides the best flavor profile.
- Achieving the Perfect Bake – Doneness Cues: Look for a deep golden-brown color on the topping and vigorous bubbling of the berry filling. If the topping browns too quickly, loosely tent it with foil.
- Cooling Time is Crucial: It’s tempting to dig in immediately, but allowing the crumbl to cool for at least 20-30 minutes helps the fruit filling set properly. This prevents a soupy mess and allows the flavors to meld beautifully.
- Use a Baking Sheet: Always place your crumbl dish on a baking sheet. This catches any bubbling fruit juices that might overflow, saving your oven from a sticky mess.
What to Serve With Your Berry Crumbl
While this Ultimate Berry Crumbl is utterly divine on its own, here are some classic pairings that elevate the experience:
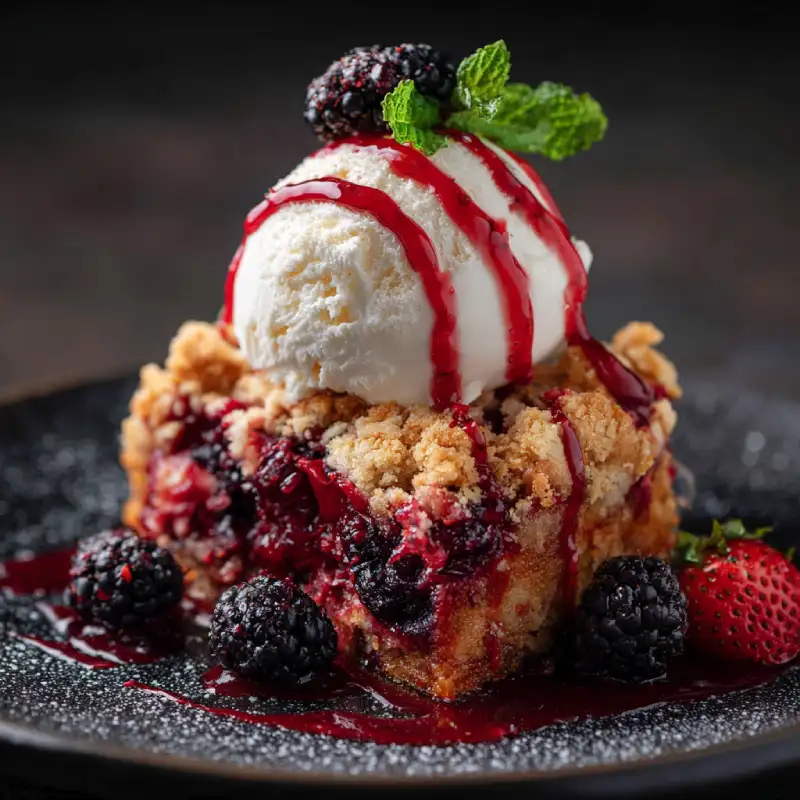
- Classic Vanilla Ice Cream: The quintessential accompaniment! A scoop of good quality vanilla bean ice cream, slowly melting into the warm, gooey berries and crispy topping, is pure bliss.
- Homemade Whipped Cream: Light, airy, and delicately sweetened, homemade whipped cream adds a touch of elegance and balances the rich flavors of the crumbl.
- Greek Yogurt for a Lighter Option: For a healthier or breakfast-appropriate serving, a dollop of plain or vanilla Greek yogurt adds a creamy, tangy contrast that is surprisingly refreshing.
- Aromatic Coffee or Tea: A hot cup of freshly brewed coffee or a soothing herbal tea makes for a delightful complement, perfect for a cozy afternoon treat.
Storing and Reheating Your Crumbl
One of the best things about The Ultimate Berry Crumbl is how well it stores, meaning you can enjoy it for days!
- Room Temperature Storage: If you plan to consume the crumbl within 1-2 days, you can store it loosely covered at room temperature. This helps keep the topping crisp.
- Refrigerating for Longer Freshness: For longer storage, cover the crumbl tightly with plastic wrap or aluminum foil and refrigerate for up to 4-5 days. The topping may soften slightly in the fridge.
- Best Reheating Methods: To bring your crumbl back to its warm, delicious glory, reheat individual portions in the microwave for 30-60 seconds, or reheat the entire dish in an oven preheated to 330°F (165°C) for 15-20 minutes, or until warmed through and the topping crisps up again.
- Freezing: You can even freeze baked crumbl! Allow it to cool completely, then wrap tightly in plastic wrap and then foil. It will keep for up to 3 months. Thaw in the refrigerator overnight and then reheat as desired.
Frequently Asked Questions About Berry Crumbl
Can I use different fruits?
My crumbl topping isn’t crispy, what went wrong?
How do I know when it’s fully baked?
Can I prepare this ahead of time?
The Ultimate Berry Crumbl
- Total Time: 1 hour 5 minutes
- Yield: 8-10 servings
Description
Unlock the secrets to the most irresistible berry crumbl you’ll ever bake. This recipe guarantees a perfect balance of crispy topping and juicy, sweet-tart berries every single time.
Ingredients
- For the Berry Filling:
- 6 cups mixed berries (fresh or frozen)
- 1/2 cup granulated sugar (adjust to taste)
- 3 tablespoons cornstarch or all-purpose flour
- 1 teaspoon lemon zest (from 1/2 lemon)
- For the Crumbl Topping:
- 1 1/2 cups all-purpose flour
- 1 cup old-fashioned rolled oats
- 1/2 cup granulated sugar
- 1/2 cup light brown sugar, packed
- 1/2 teaspoon salt
- 1 cup (2 sticks) unsalted butter, cold and cubed
- 1 teaspoon pure vanilla extract
Instructions
- 1. Prepare Berries: In a large bowl, gently combine mixed berries, granulated sugar, cornstarch, and lemon zest. Toss carefully. Set aside. Preheat oven to 375°F (190°C).
- 2. Make Topping: In a separate bowl, whisk flour, oats, both sugars, and salt. Cut in cold butter with fingertips or a pastry blender until coarse crumbs form with pea-sized butter pieces. Stir in vanilla extract.
- 3. Assemble: Pour berry filling into a 9×13 inch baking dish. Sprinkle crumbl topping evenly over the berries.
- 4. Bake: Place dish on a baking sheet. Bake for 40-50 minutes, until topping is golden brown and berries are bubbling. Cool for 20-30 minutes before serving.
- Prep Time: 20 mins
- Cook Time: 45 mins