
Introduction: Your New Go-To Rustic Apple Tart Recipe
Oh, the rustic apple tart. Just uttering the words conjures images of cozy kitchens, the sweet scent of cinnamon and baked apples wafting through the air, and that glorious, golden-brown crust. This isn’t just any old apple pastry; this is the rustic apple tart recipe you’ve been dreaming of – a delightful dessert where buttery, flaky crust meets perfectly tender, spiced apples in a delightfully unpretentious package. Forget fussy presentation; here, flavor and texture reign supreme, delivering a satisfying crunch with every sweet, tangy bite. If you’re looking for an impressive yet surprisingly simple dessert that tastes like a warm hug, you’ve found your culinary soulmate. See more good recipes here
My Journey to the Perfect Rustic Apple Tart
As a passionate home baker, I’ve spent countless hours in my kitchen, experimenting with various apple varieties, crust recipes, and spice blends. My quest? To find the ultimate rustic apple tart recipe that balanced simplicity with sensational flavor. Many tries resulted in soggy bottoms, tough crusts, or bland fillings. But through trial, error, and a lot of happy snacking, I finally perfected a recipe that consistently delivers. This isn’t a recipe born from a cookbook alone; it’s a culmination of years of hands-on experience and a love affair with baking.
Why This Recipe Stands Out
What makes this rustic apple tart recipe truly special? It’s the harmonious balance. We’re talking about a crust that’s effortlessly flaky and buttery, providing the perfect counterpoint to the soft, warmly spiced apple filling. It tastes like it took hours of painstaking effort, but I promise, it’s wonderfully forgiving and straightforward to assemble. The beauty of a rustic tart lies in its imperfections – no need for crimped edges or elaborate lattice work. Just pure, unadulterated deliciousness.
Table of Contents
- Introduction: Your New Go-To Rustic Apple Tart Recipe
- How This Rustic Apple Tart Recipe Works
- Ingredients and Smart Substitutions
- Step-by-Step Instructions: Baking Your Rustic Apple Tart
- Expert Tips for a Flawless Rustic Apple Tart
- What to Serve With Your Rustic Apple Tart
- Storing and Reheating Your Rustic Apple Tart
- Rustic Apple Tart Recipe FAQs
How This Rustic Apple Tart Recipe Works
Let’s dive into the magic behind this delightful dessert.
Flaky, Buttery Crust
The foundation of any great tart is its crust, and ours is no exception. This recipe utilizes an all-butter crust, which, when handled correctly, yields layers of pure, golden flakiness. The secret is keeping ingredients cold and not overworking the dough, allowing those little pockets of butter to create steam during baking, pushing the layers apart. The result is a tender, crisp base that practically melts in your mouth.
Perfectly Tender, Spiced Apples
No one wants crunchy apples in an apple tart! We’ll guide you on selecting the best apple varieties that hold their shape while softening beautifully. A thoughtful blend of spices – think cinnamon, nutmeg, and a whisper of ginger – elevates the natural sweetness of the fruit, creating a filling that’s both comforting and fragrant.
Simple Assembly, Stunning Results
This is where the ‘rustic’ truly shines. Unlike a traditional pie that requires precise crimping, our tart involves a simple fold-over technique. You’ll roll out the dough, pile the apples in the center, and fold the edges over. It’s wonderfully unfussy, and the slightly imperfect edges are part of its charm, promising a homemade touch that everyone adores.
Ingredients and Smart Substitutions for Your Rustic Apple Tart
Here is what you need and why:
For the All-Butter Crust (Why Butter Matters)
Unsalted Butter, very cold and cubed: This is non-negotiable for a truly flaky crust. Cold butter creates steam pockets when baking, resulting in those desirable layers. Unsalted allows you to control the seasoning. Dairy-free butter sticks can be substituted for a vegan version, ensuring they are firm.
All-Purpose Flour: The backbone of our crust. Sifting it isn’t strictly necessary but can lead to a slightly lighter texture. For a gluten-free option, use a 1:1 gluten-free baking flour blend containing xanthan gum.
Ice Water: Crucial for bringing the dough together without melting the butter. Have more on hand than you think you’ll need, but add sparingly, a tablespoon at a time, until the dough just comes together.
Granulated Sugar: A touch of sugar helps with browning and adds a subtle sweetness to the crust.
Salt: Essential for flavor balance, cutting through the richness of the butter and enhancing the overall taste.
Choosing the Best Apples (Flavor & Texture Guide)
Firm, Tart Apples (e.g., Granny Smith, Honeycrisp, Braeburn, Fuji): A mix is often best for complexity. Granny Smith provides tartness and holds its shape well. Honeycrisp adds sweetness and a pleasant chew. Avoid overly soft or mealy apples like Red Delicious, as they can turn to mush. My personal favorite blend is 50% Granny Smith and 50% Honeycrisp!
Essential Spices and Sweeteners (Balancing Taste)
Light Brown Sugar: Adds moisture and a lovely caramel note, deepening the overall flavor of the apple filling.
Granulated Sugar: Balances the tartness of the apples and helps create a syrupy texture.
Ground Cinnamon: The quintessential apple spice. Use good quality, fresh cinnamon for the best aroma and flavor.
Ground Nutmeg: A pinch adds warmth and complexity. Freshly grated is even better!
Lemon Juice: Helps to brightens the flavors of the apples and prevents browning. Don’t skip this!
Optional Enhancements (Zest, Extracts, Nuts)
Lemon Zest: Enhances the lemon juice’s brightness. Add it with the spices.
Vanilla Extract: A teaspoon can add a warm, comforting background note to the filling.
Chopped Pecans or Walnuts: For added texture and nutty flavor, sprinkle them over the apples before folding the crust.
Turbinado Sugar: Sprinkled over the crust before baking, it adds a lovely sparkle and a slight crunch.
Step-by-Step Instructions: Baking Your Rustic Apple Tart
Follow these simple steps for a perfect rustic apple tart recipe:
1. Prepare the Dough (Chill Time is Key)
In a large bowl, whisk together the flour, granulated sugar, and salt. Add the very cold, cubed butter and use your fingertips or a pastry blender to cut the butter into the flour until it resembles coarse meal with some pea-sized pieces of butter remaining. Gradually add ice water, 1 tablespoon at a time, mixing until the dough just comes together. Be careful not to overmix! Form the dough into a disc, wrap it tightly in plastic wrap, and refrigerate for at least 30 minutes, or preferably an hour. This chill time is crucial for developing flakiness and making the dough easier to handle.
2. Slice and Season the Apples (Uniformity for Even Cooking)
While the dough chills, peel, core, and slice your apples into thin, uniform pieces (about 1/4 inch thick). Aim for consistency so they cook evenly. In a large bowl, combine the sliced apples with brown sugar, granulated sugar, cinnamon, nutmeg, and lemon juice (and any optional enhancements like zest or vanilla extract). Toss gently to ensure all apple slices are coated. Let this mixture sit for about 10-15 minutes, allowing the sugars to draw out some of the apple’s juices, which will create that delicious syrup.
3. Assemble the Tart (The Rustic Fold)
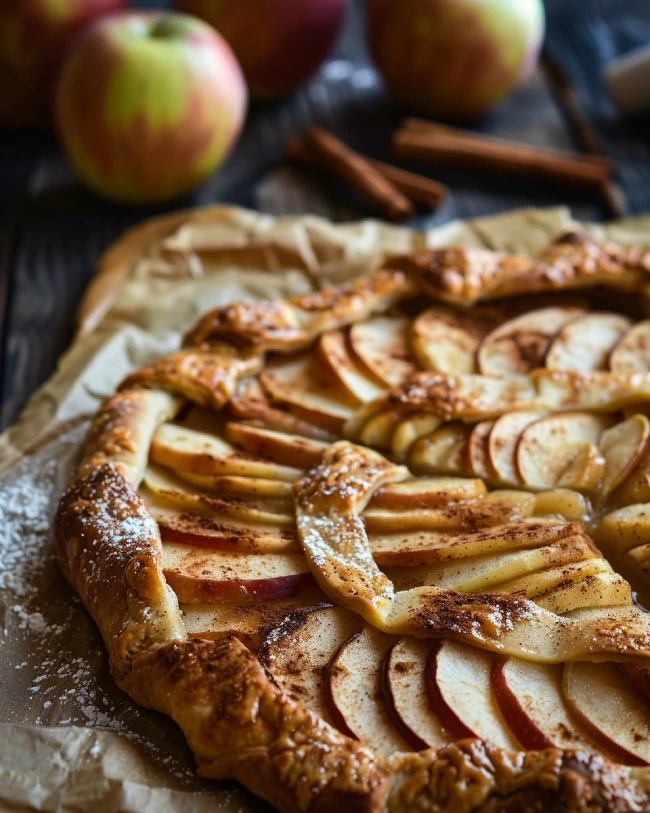
Preheat your oven to 400°F (200°C). Line a baking sheet with parchment paper. On a lightly floured surface, roll out your chilled dough into a roughly 12-14 inch circle (it doesn’t have to be perfect!). Carefully transfer the rolled dough to your prepared baking sheet. Arrange the seasoned apple slices in the center of the dough, leaving a 2-inch border all around. Don’t worry about stacking them too perfectly; a slight mound is good! Gently fold the dough border up and over the apples, pleating it as you go. The center of the apples will remain exposed. If desired, brush the exposed crust with a little milk or egg wash and sprinkle with turbinado sugar for extra sparkle.
4. Bake to Golden Perfection (Visual Cues)
Bake the tart for 40-50 minutes, or until the crust is deeply golden brown and the apples are tender when pierced with a knife. If the crust starts to brown too quickly, you can loosely tent the edges with aluminum foil. Once baked, remove from the oven and let it cool on the baking sheet for at least 15-20 minutes before attempting to move it. This allows the juices to set, preventing a runny tart when sliced. For that extra glossy finish, you can brush the warm apples with a little melted apricot jam or honey.
Expert Tips for a Flawless Rustic Apple Tart
- Don’t Overwork the Dough: The key to a tender, flaky crust is minimal handling. Over-mixing develops gluten, leading to a tough crust. Mix until just combined.
- Keep Everything Cold: Cold butter and ice water are essential for a flaky crust. If your kitchen is warm, chill your flour and even your mixing bowl.
- Slice Apples Uniformly: Unevenly sliced apples will cook at different rates, leading to some being mushy and others still firm. Aim for consistent 1/4-inch slices.
- Ventilation is Your Friend: While a rustic tart doesn’t require a top crust, the open design allows steam to escape, preventing a soggy filling.
- Achieve that Beautiful Golden Crust: Don’t be afraid to let it get deeply golden, even bordering on dark brown in spots. This indicates a fully baked, crisp crust with excellent flavor. If it’s browning too fast, tent with foil.
- Let It Rest: Patience is a virtue! Allowing the tart to cool for at least 15-20 minutes before serving allows the hot apple juices to thicken, ensuring perfect slices.
What to Serve With Your Rustic Apple Tart
While this rustic apple tart recipe is absolutely divine on its own, a few accompaniments can elevate the experience:
Classic Pairings (Ice Cream, Cream)
- Vanilla Bean Ice Cream: The classic choice! The cool, creamy vanilla is the perfect counterpoint to the warm, spiced apples.
- Freshly Whipped Cream: Lightly sweetened whipped cream adds a cloud-like texture and rich dairy note.
- Crème Fraîche: For a slightly more sophisticated and tangy topping, crème fraîche offers a beautiful contrast.
Unexpected Delights (Cheese, Caramel Sauce)
- Sharp Cheddar Cheese: A traditional New England pairing that offers a surprising savory kick, balancing the sweetness.
- Homemade Salted Caramel Sauce: Drizzle warm caramel over each slice for an extra layer of decadence.
- A Hot Cup of Coffee or Tea: For a simple, comforting end to a meal, pair it with your favorite warm beverage.
Storing and Reheating Your Rustic Apple Tart
You’ve baked your gorgeous rustic apple tart recipe, and if there are any leftovers (a big if!), here’s how to keep them fresh and delicious:
Storage Guidelines (Room Temp, Fridge, Freezer)
- Room Temperature: The tart can be stored loosely covered at cool room temperature for up to 2 days. After that, refrigeration is best.
- Refrigerator: For longer storage, cover the tart loosely with plastic wrap or aluminum foil and refrigerate for up to 3-4 days.
- Freezer: To freeze, either wrap individual slices tightly in plastic wrap, then foil, or wrap the whole cooled tart in several layers of plastic wrap and then foil. It will keep in the freezer for up to 2-3 months. Thaw in the refrigerator overnight before reheating.
Best Reheating Methods (Oven Revival)
- Oven (Recommended): This is the best way to revive your tart, bringing back its crisp crust. Preheat your oven to 350°F (175°C). Place the tart directly on a baking sheet and heat for 10-15 minutes, or until warmed through and the crust is crisp again.
- Microwave (Use with Caution): While convenient, microwaving will soften the crust considerably. If you’re okay with a softer crust, heat individual slices for 20-40 seconds, or until warm.
Rustic Apple Tart Recipe FAQs
Can I use store-bought pie crust?
What’s the best way to prevent a soggy bottom?
Can I make this tart ahead of time?
Are there other fruit variations I can try?
Delicious & Easy Rustic Apple Tart
- Total Time: 1 hour 20 minutes
- Yield: 8 servings
Description
Unlock the secret to a perfectly flaky, buttery crust embracing tender, spiced apples with this straightforward rustic apple tart recipe. It’s an inviting dessert that’s both stunning to look at and incredibly satisfying to eat, perfect for any occasion.
Ingredients
- 1 ½ cups (180g) all-purpose flour, plus more for dusting
- 1 tbsp granulated sugar
- ½ tsp salt
- ½ cup (113g) unsalted butter, very cold and cubed
- ¼ cup (60ml) ice water, plus more if needed
- 2 lbs (approx. 4-5 medium) firm, tart apples (e.g., Granny Smith, Honeycrisp), peeled, cored, and thinly sliced
- ¼ cup (50g) light brown sugar, packed
- 2 tbsp granulated sugar
- 1 tsp ground cinnamon
- ¼ tsp ground nutmeg
- 1 tbsp fresh lemon juice
- Optional: 1 tbsp turbinado sugar (for sprinkling)
Instructions
- 1. Make the Dough: In a large bowl, whisk flour, 1 tbsp granulated sugar, and salt. Cut in cold butter using fingertips or a pastry blender until coarse meal with pea-sized butter pieces. Gradually add ice water, mixing until dough just comes together. Form into a disc, wrap, and refrigerate for 30-60 minutes.
- 2. Prepare Apples: While dough chills, combine sliced apples with brown sugar, 2 tbsp granulated sugar, cinnamon, nutmeg, and lemon juice. Toss gently and let sit for 10-15 minutes.
- 3. Assemble the Tart: Preheat oven to 400°F (200°C) and line a baking sheet with parchment paper. On a lightly floured surface, roll dough into a 12-14 inch circle. Transfer to baking sheet. Arrange apple mixture in the center, leaving a 2-inch border. Fold dough border up and over apples, pleating as you go. Brush exposed crust with water or milk and sprinkle with turbinado sugar if desired.
- 4. Bake: Bake for 40-50 minutes, or until crust is deeply golden brown and apples are tender. If crust browns too quickly, tent edges with foil. Let cool on baking sheet for at least 15-20 minutes before serving.
- Prep Time: 30 mins
- Cook Time: 50 mins